

Click the blue circle throughout the platform to activate help panels on every page. These contain helpful tips and tutorial videos.
Currently six reports can be generated:
1. Case Profile
2. Net Worth Report
3. Marital Estate Worksheet(s)
4. Income and Expense Report
5. Spending Plan(s)
6. Parenting Plan Agreement
Yes, four reports contain data that is all downloadable to a .CSV, and all bank-synced transactional data is downloadable.
1. Net Worth Report
2. Marital Estate Worksheet(s)
3. Income and Expense Report
4. Spending Plan(s)
5. Bank-synced transactional data
We currently do not provide email or text alerts about platform activity.
Our commenting feature allows you to communicate on the platform with anyone whom you invite. If anyone adds a comment on the platform, you will see a red dot on the case dashboard and the comment/reply.
Professionals will also see a blue circle on their case card that identifies all case activity.
The Commenting icon allows anyone to click to add / reply to comments. Attaching specific information to specific items is helpful for everyone and prevents having to search through email for the data. Please note: all comments are fully transparent and can be seen by anyone invited to the case.
On the Case dashboard, the red dot on the alert bell will indicate the list of new comments.
The red dot also indicates unread while the gray dot indicates read. (The yellow dot indicates where to locate the unread comment.) Attaching specific information to specific items is helpful for everyone and prevents having to search through email for the data. Please note: all comments are fully transparent and can be seen by anyone invited to the case.

The Case Profile is comprised of multiple sections that all relate to the sections under the “Family” heading. To edit any of the information on the Case Profile, click either the spouse, the child, or Relationship Details.
To print and/or save as a pdf, just click the blue print button.
It is not possible to delete the entire report becasue the information pulls in from several different pages within the Family section. However, you can edit or delete the data on the individual pages.
At the top of the Relationship Details page, there is a dropdown box for the “Type of Relationship.” If Marriage or Domestic Partnership is selected, then the prenup selection will be saved.
Click Assets or Debts in the purple navigation bar. Find the type of asset or debt you want to add in the list on the right. Click the blue text link that says +Add New.
Click Assets and Debts in the purple navigation bar. Find the card with the asset or debt you want to edit. Double click the card to open to the Detail Page. Click into any field to edit. As soon as you tab or click out of the field you will see a green “√ saved” alert to indicate it has been auto-saved.
No. In most cases the current values are all that will be needed.
In some cases, it is agreed to use a different date for valuation and only then is that second field necessary, but you will know if your case is being settled based on a different valuation date. Your professionals will guide you.
When you click the ownership category, helper text explains the basic concepts behind the options. However, if the ownership categorization is unclear, click TBD and your professional will help identify the financial facts that will confirm the correct ownership category.
On the Asset/Debt detail page, you have a choice. If you select the account link in the drop down box, then the current balance field will be automatically updated. An automatically updated balance sheet or Net Worth Report can be very helpful to everyone on the team.
However, in some cases it might not be helpful or necessary to have today’s balance, and in that case, you can delink the account
If you want to sync the account and don’t see your account listed, click the link to take you to the Income & Expense Sync page where you do establish the link.
Currently any expense in the manual section that has been associated with an asset will appear in the Monthly Expense section. However, we are aware that all of the synced expenses that have been associated are not appearing here. We apologize and are working on an immediate fix. As a short-term work around, we suggest that you open the income and expense report, identify the categories and costs and enter them into the comment section next to the monthly expense section. Then you will have that data right there attached to the item as a reference point for settlement discussions.
The list of account types is simply for convenience. If you have a different type of account, just enter it into the name field, for example “Jane’s TSP,“ and that way as you review all of the asset cards, you will see all the accounts your family/client holds.
A net worth cannot be generated unless each asset and debt has an ownership and dollar value.
Click each item that displays a TBD to edit.
1. If you have selected “I have a different valuation” to represent two opinions of value, the TBD will remain on the NWR until you choose one and de-select that box.
2. If you have selected the ownership category, “Separate Marital,” a TBD will appear until you identify the precise amount to allocate as the separate property claim for the spouse(s).
3. If the ownership category selected is TBD, the TBD will flow to the NWR until the correct ownership category is specified.
All financial account asset detail pages contain a “Belongs to the Children” box. If you check this, the total will flow to the NWR so it will be accounted for, but the total will not be included in the total net worth.
If an asset or a portion of an asset has already been identified as Separate Property, then that amount is not subject to division. However, if it will be used to provide an equalizing payment to the other spouse, that information can be entered in the notes field next to it.
If, for the purposes of division, you want to convert an uneditable field to an editable field, just click back to the item and change the ownership category to Joint/Marital and that will allow the balance to be divided.
Employment income must first be defined by the Employer. If you click Income and do not see the employer listed in the dropdown box, click to the spouse page, and enter the name of the Employer in the Employment section. (You can add multiple employers by clicking the blue +Add Employer at the bottom of the section). Then click back to Income and choose it from the drop down menu.
Other Income, such as disability, retirement, unemployment, tax refund, etc. are listed in the Income section under Government or Other Income. Any items entered here will flow to the Income & Expense report, but are not represented on the individual spouses pages or on the case profile.
The income section is designed to capture the Gross and Net income for both spouses.
The Income and Expense Report is designed to analyze net inflows and outflows on a monthly basis.
Whether you have a one-time or multiple bonus checks, divide the total NET by 12 and enter it so that it flows to the report correctly.
We designed the platform to allow you to associate all inflows and outflows with spouses, children and asset/debt items. However this requires that they are entered first so that they will then appear in the dropdown boxes to link.
Be sure to enter children’s names and each asset and debt item first and then when you choose to link an income or expense to them, it will appear in the drop down box.
Click Relationship Details under “Family.” You will find a field for Health Insurance in the Overview Section.
Yes! We use bank-level security and all best practices for every aspect of our platform.
We have integrated with Plaid, the industry leader, to create the digital handshake that allows us to sync to financial institutions.
No invitee has access to login credentials. Even if both clients/spouses have been invited and both connect their respective accounts, neither can see the other’s login.
This replicates the process by which both parties download and exchange bank statements, yet the data is digital so immediate and far easier and less expensive to work with.
Yes! We have designed the platform to merge all manually and synced data. That is perfect for situations where you can sync your own accounts, for example, and manually enter data for other accounts.
Yes! We have created an easy-to use interface to allow you to enter all individual transaction items.
We know that the divorce process is a lot of work. We designed dtour.life to make it easier and less expensive to provide the financial data your professionals need to help you design a smarter settlement.
Every case is different, so we provide the ability to customize each expense so that you have more information about the cost to carry a house, for example, or the amount required for the children every month.
Discuss with your professional the extent to which it would be helpful to customize the income and expense data.
Currently any expense that has been manually entered and associated with an asset will appear in the Monthly Expense section
However, we are aware that all of the synced expenses that have been associated do not appear.
We apologize and are working on an immediate fix. As a short-term work around, we suggest that you open the Income & Expense report, identify the categories and costs, and enter them into the Comment section next to the monthly expense section. Then you will have that data right there attached to the item as a reference point for settlement discussions.
Click the box “Show all categories” at the top left and that will expand the income and expense categories. Once you enter a $ amount and de-select “show all categories,” only the fields with a $ value will appear and all blank categories will disappear.
We are working on a re-design that will allow you to upload individual templates to use with clients. As a short-term fix, we have added the functionality for you to download the content to a word document so that you can accomplish the same thing. This way your client(s) can use this tool to draft the Plan and then you can download and merge it with your language or sections required by your jurisdiction.
In the main category section you will find “Miscellaneous/Other.” Select that and then scroll down to add +Custom Subcategory to add what you need.
You can add +Custom Subcategory in every sub-category section, too.
Spouses: Follow the directions below to cancel your subscription. Then, when you are ready to resume, log-in with the same email you used for the original account. You will be prompted to re-subscribe and all of your data will be there.
Professionals: you can follow the same steps above for your professional account, or you can simply archive the individual case to put it on hold and terminate billing for it. To archive, click Case Settings and scroll to the bottom.
Click Case Settings. The payor on the case has a payor flag next to their name. Everyone else with Admin privileges has a blue “Become Payor” link next to their name. (If there is no blue “Become Payor” link, then the payor must assign them with Admin privileges). Once you click that Become Payor link, billing will automatically switch and the new payor will be prompted to enter a credit card then or at their next log-in.
Click Case Settings and scroll down to the bottom to Archive the case. If you are a professional, this will come off your case count on the next billing cycle. (Your next bill might include some prorated time for case access.)
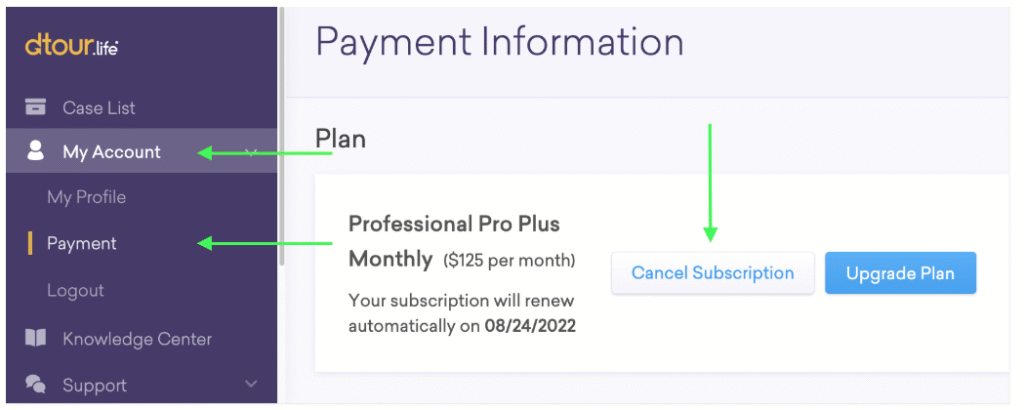
Click “My Account.”
Click “Payment.”
Click “Cancel Subscription” next to your billing plan.
Please note that if you cancel during a billing cycle, you will only be billed on a pro rata basis for the final month.
You have a few options for deleting a case.
If there is little data in the case, you can simply edit the names of the two spouses and use the case for another matter, or
Archive the case by clicking Case Settings and scrolling to the bottom, or
Email us at [email protected] and request that we permanently delete the case. We simply need the case number in the url bar (it will look something like this: app.dtour.life/cases/2382.)
No one who has not been specifically invited to a case will ever have access to it.
When an email is associated with multiple cases, then the system automatically provides you with a list of and access to those cases.
For example, if a professional uses a personal email to sign-up for an account and then invites themselves to another case by using that same personal email, then both cases will appear. (This has happened!) This simply allows an individual to have access to the cases to which they have been invited, but is not an indication that an invited client will see other cases.
If you are a professional, the first thing to do is to check the Activity log on your dashboard to confirm that there was activity in the case. Sometimes we think data has been entered when in fact it has not. The Activity log captures every key stroke on each case.
If you are a client or a professional and you absolutely know that data was entered, then typically what has happened is that one person was invited with an email that is NOT the same email used to sign-up. If this happens, then each person is accessing a different case.
If it is confirmed that there is an email discrepancy, there are a few options to solve.
• Professionals: Click Case Settings and terminate the invitation to the wrong email and re-enter the correct one.
or
• Clients/spouses: Click Account and edit the email address to match the one to which you were invited.
If none of these work, email us at [email protected] and we will assist.
If you created an account with the wrong role, please email us at [email protected] so that we can convert the account type for you.
If you created an account with the wrong role, please email us at [email protected] so that we can convert the account type for you.